To create an encrypted disk image on Mac, you can use the built-in Disk Utility. Open Disk Utility, go to File, then New Image, and select Blank Image.
Choose the size, format, and encryption type, then set a password. Creating an encrypted disk image on Mac provides a secure way to store sensitive files. This process ensures that your data is protected from unauthorized access and provides an extra layer of security for your important documents and information.
With the use of Disk Utility, Mac users can easily create encrypted disk images to safeguard their confidential data from potential security breaches. This method is an effective way to ensure the privacy and security of sensitive files on your Mac device.
Credit: www.cnet.com
Preparation
Before creating an encrypted disk image on Mac, it’s important to check free disk space to ensure there’s enough room for the process. Also, close unnecessary applications to prevent any disruptions during the procedure.
Creating The Disk Image
To create an encrypted disk image on Mac, navigate to Disk Utility. Click on the ‘New Image’ option to proceed.
Setting Encryption
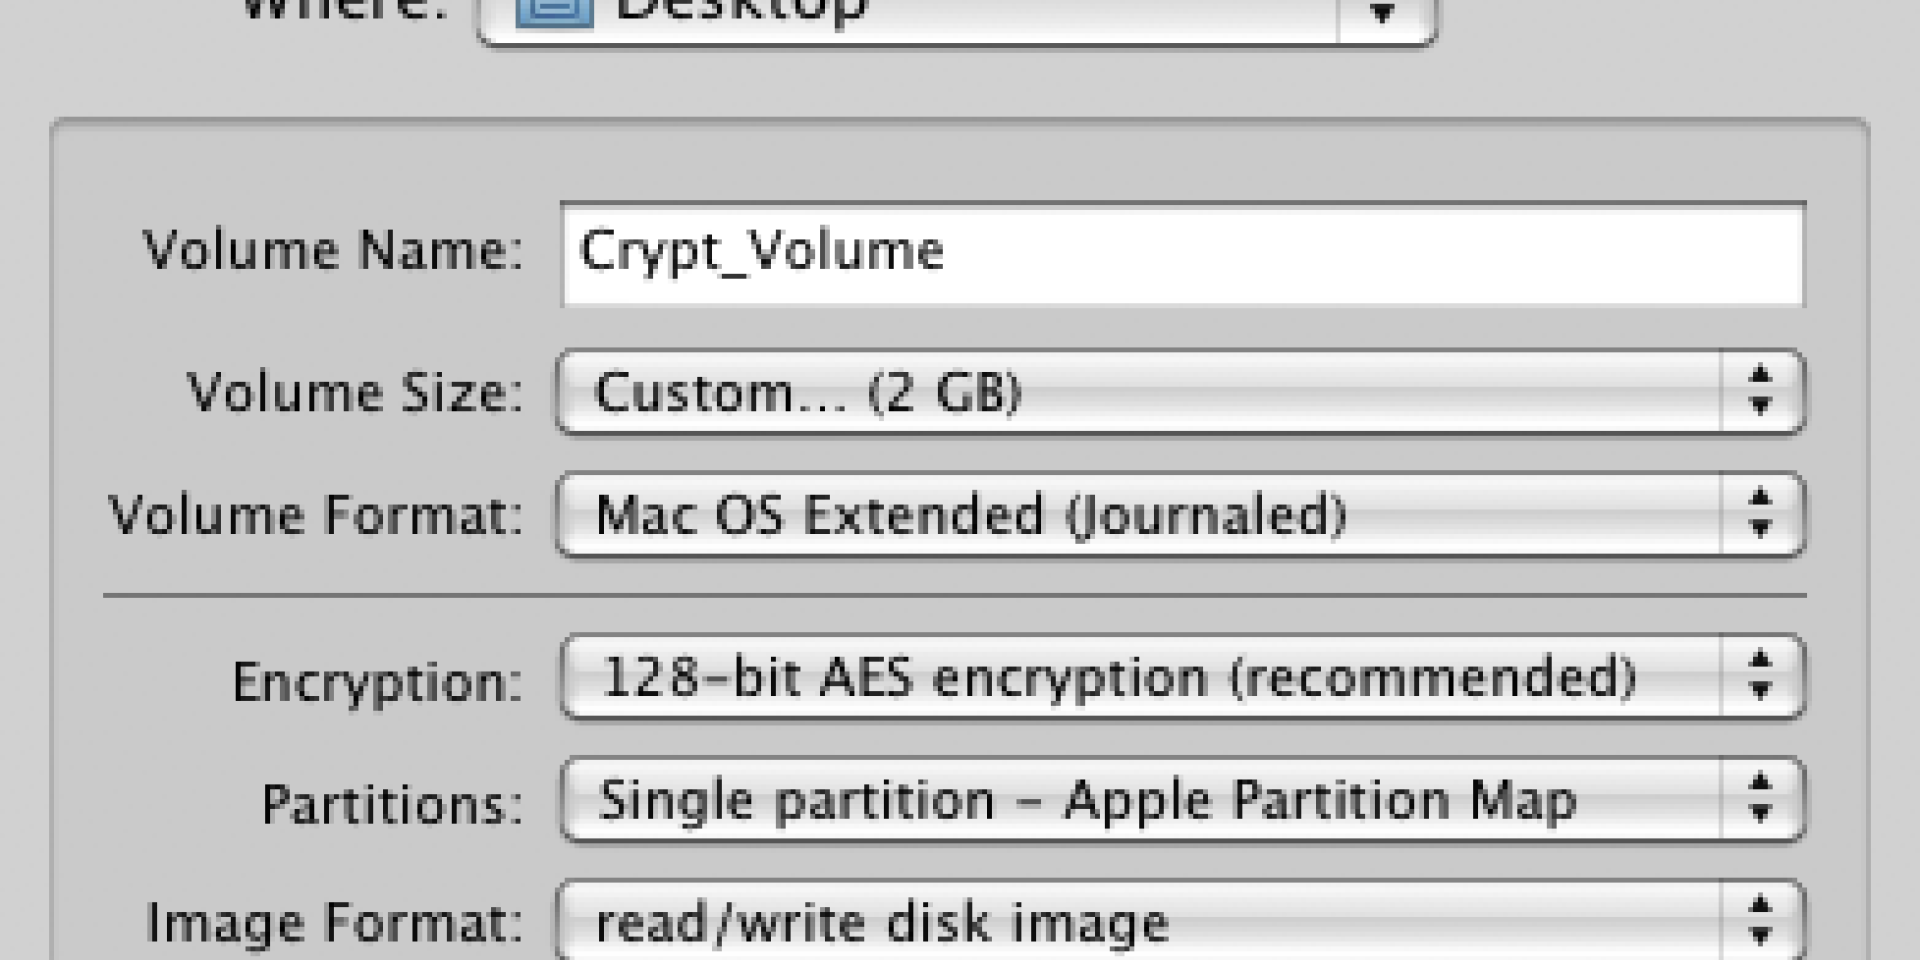
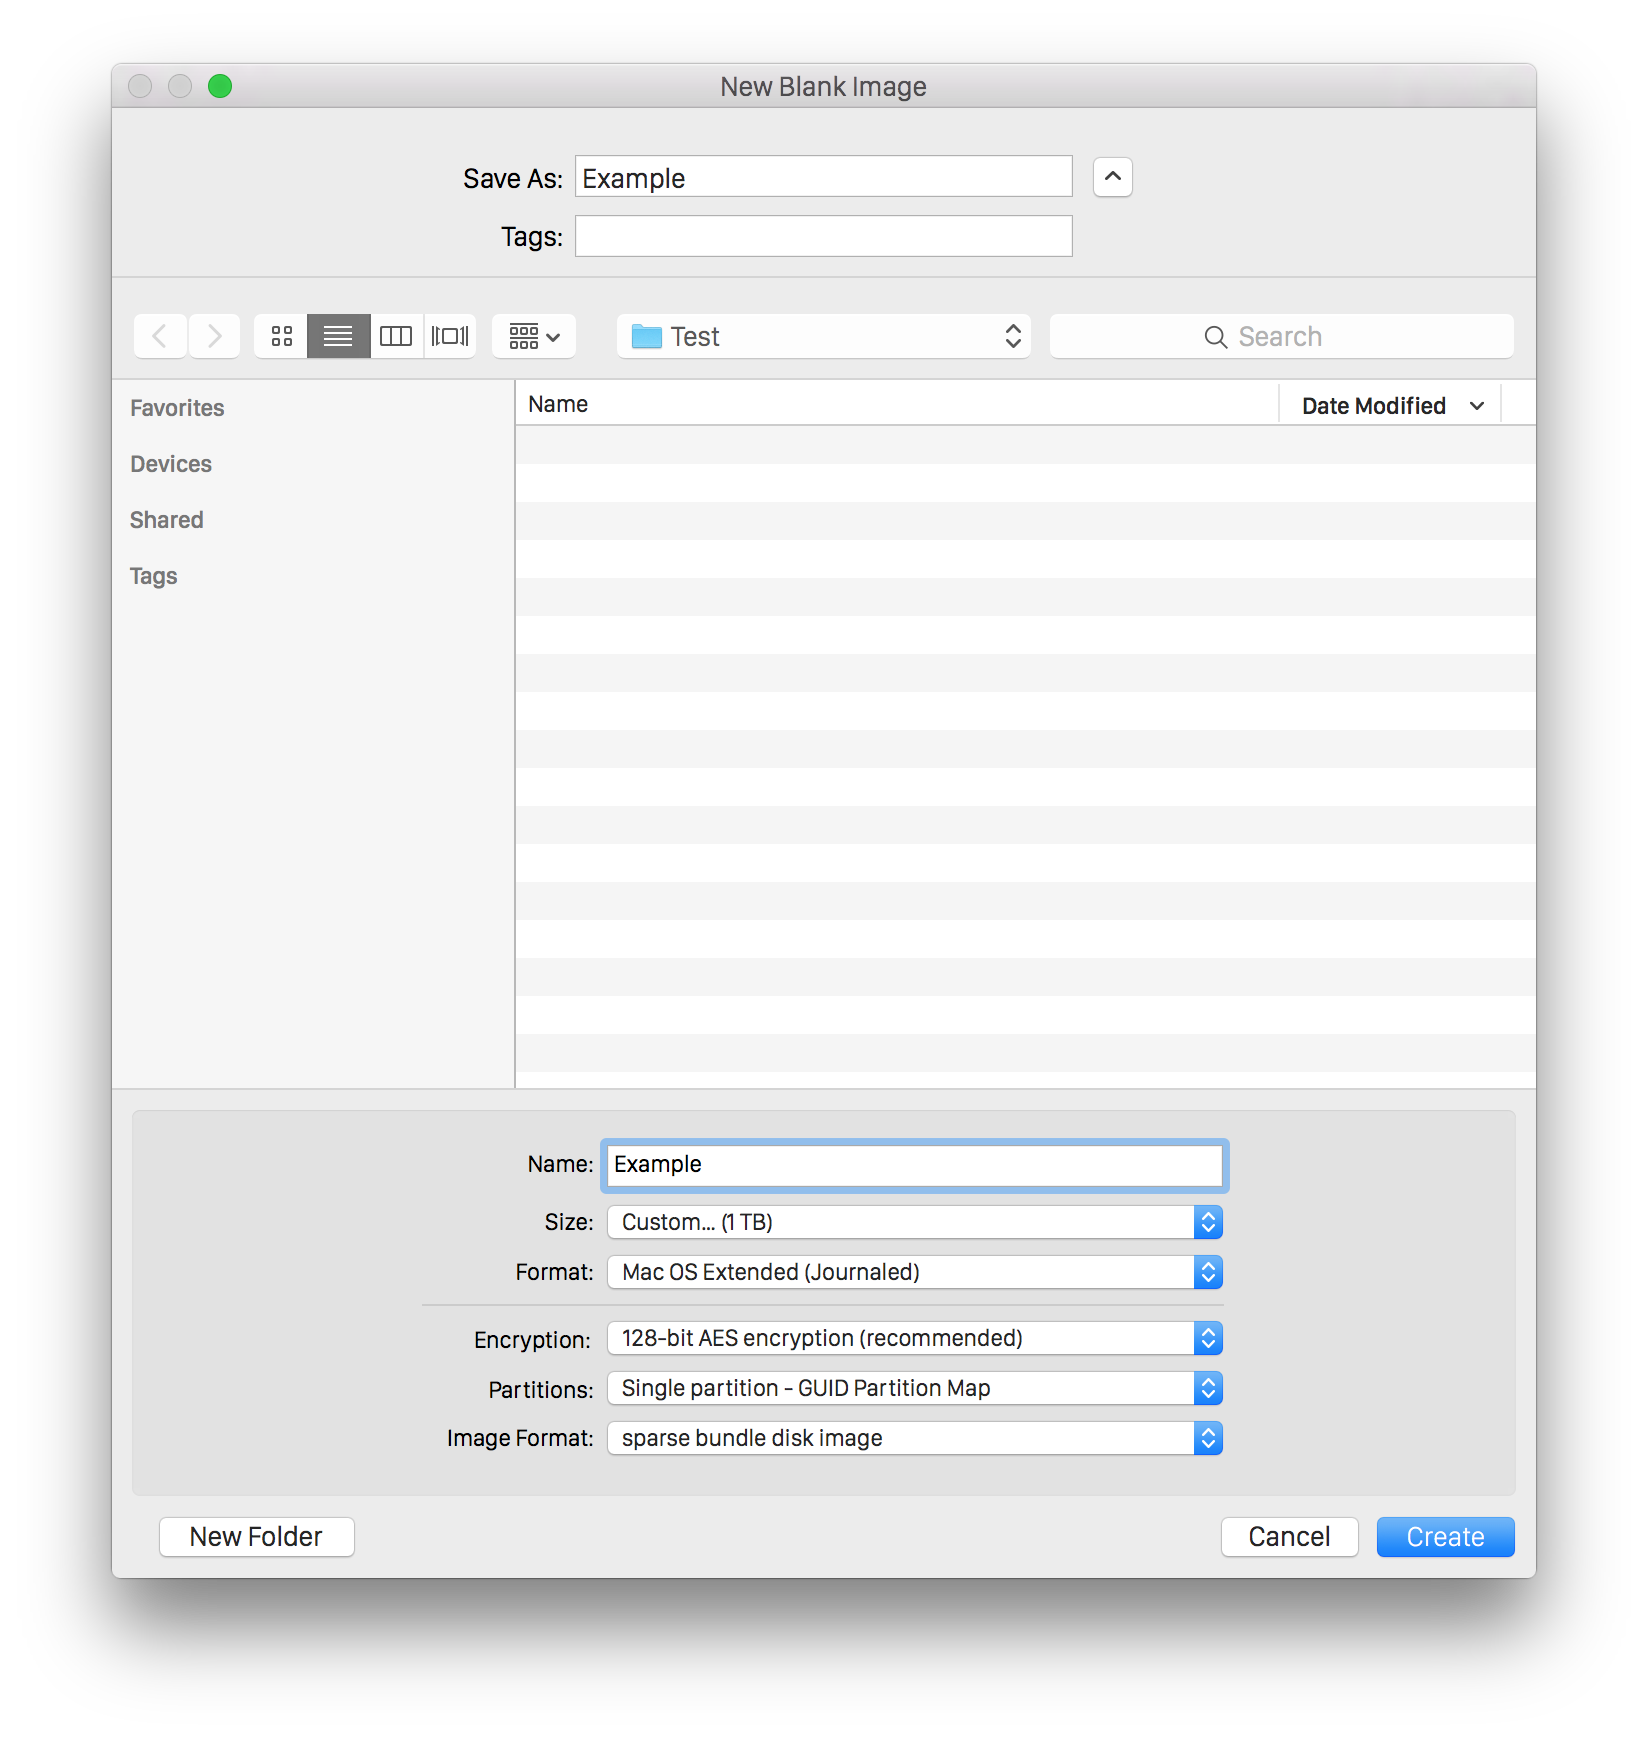
To create an encrypted disk image on your Mac, you first need to set the encryption. Start by choosing the encryption type that best suits your needs. Mac offers multiple encryption options, including 128-bit and 256-bit AES encryption. Once you’ve selected the encryption type, you’ll need to set a password for the disk image. Make sure to choose a strong password that includes a mix of uppercase and lowercase letters, numbers, and special characters. This will enhance the security of your encrypted disk image.
After setting the password, you’ll also need to choose the image format for your disk image. The two most commonly used image formats are read/write and read-only. The read/write format allows you to add, modify, and delete files on the disk image, while the read-only format only allows you to view and copy files.
Remember to carefully select the encryption type, set a strong password, and choose the appropriate image format to ensure the security and functionality of your encrypted disk image on your Mac.

Credit: www.youtube.com
Specifying Image Details
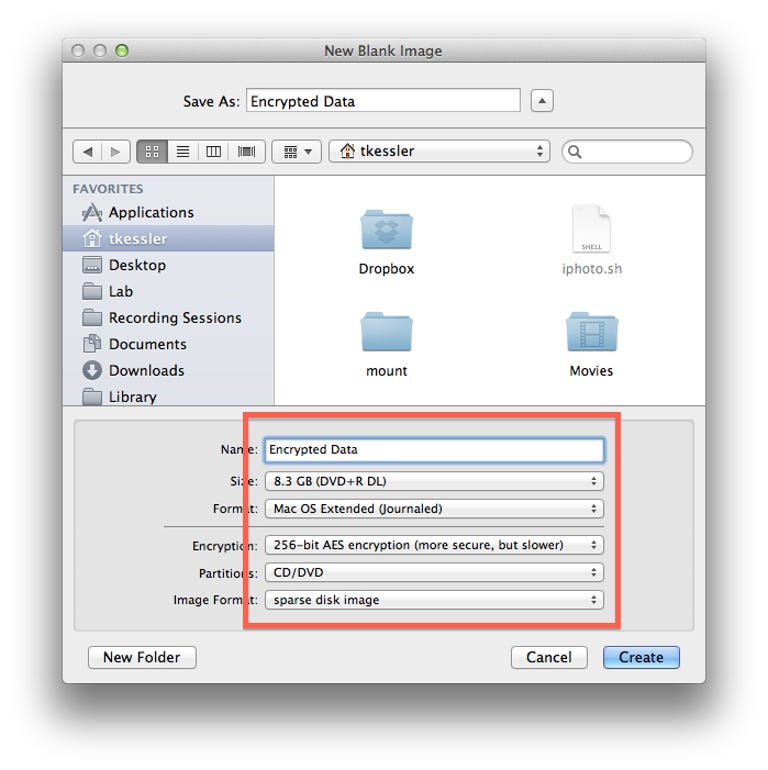
When creating an encrypted disk image on a Mac, it is important to specify the image details. One of the key aspects to consider is the name and save location of the disk image. It is recommended to choose a name that is easily identifiable and relevant to the content of the disk image. Additionally, selecting an appropriate and secure save location is crucial to ensure the protection of the encrypted data.
Another important factor to consider is the image size. The size of the disk image will depend on the amount of data that needs to be encrypted and stored. It is important to allocate enough space for future growth and usage, while also considering the available storage capacity of the Mac.
Completing The Process
Creating an encrypted disk image on Mac involves waiting for the image creation to complete successfully. Once the image is created, the next step is to verify the encrypted disk image to ensure it has been set up securely and is ready to use.
Using The Encrypted Disk Image
To create an encrypted disk image on Mac, open Disk Utility and click “New Image”. Choose the size and encryption type, then set a strong password. To use the encrypted image, double-click the file to mount it. Enter the password and it will appear in Finder. To eject the image, right-click on it and select “Eject”. This ensures the image is safely stored and inaccessible to unauthorized users.
Credit: blog.fosketts.net
Frequently Asked Questions On How To Create An Encrypted Disk Image On Mac
How To Create An Encrypted Disk Image On Mac?
To create an encrypted disk image on Mac, open Disk Utility, go to File, choose New Image, select image size, and set encryption level. Enter a password and save the image.
Why Should I Create An Encrypted Disk Image?
Creating an encrypted disk image adds an extra layer of security to your sensitive files or data. It helps protect your information from unauthorized access and ensures privacy.
What Are The Benefits Of Using Encrypted Disk Images?
Encrypted disk images provide a secure way to store and transfer sensitive information. They offer protection against data breaches, theft, and unauthorized access, enhancing overall data security and privacy.
Can I Access The Encrypted Disk Image On Other Devices?
Yes, you can access the encrypted disk image on other Mac devices by entering the password you set during the creation process. Ensure the receiving device has compatibility with the encryption type used for the disk image.
Conclusion
Creating an encrypted disk image on a Mac is a crucial step in protecting sensitive data from unauthorized access. By following the simple steps outlined in this blog post, you can ensure that your files are secure and only accessible to those with the proper credentials.
Taking the time to implement encryption measures is essential in today’s digital landscape where privacy and data security are paramount. Stay proactive and safeguard your information with encrypted disk images on your Mac.