To crop and rotate photos on Mac, simply open the image in the Preview app, click on the “Tools” menu, and select “Adjust Size.” Then, use the crop tool to trim the photo and the rotation tool to adjust its orientation.
Are you looking to quickly and easily crop and rotate your photos on your Mac? With the built-in Preview app, you can effortlessly make these adjustments to your images without the need for any additional software. Whether you want to straighten a crooked horizon or trim away distracting elements, the Preview app provides simple and intuitive tools for editing your photos.
In this guide, we’ll walk you through the straightforward process of cropping and rotating images on your Mac, so you can enhance your photo collection with professional-looking results.

Credit: support.apple.com
Getting Started With Photos App
|
To import photos into the Photos app, click on the “File” menu. Select “Import” and choose the photos you want to add. |
Credit: www.pixelmator.com
Understanding Cropping
Benefits of Cropping:
- Highlight your subject: Cropping allows you to remove distracting elements and focus on the main subject of your photo.
- Improve composition: By cropping, you can adjust the placement of your subject within the frame, resulting in a stronger composition.
- Enhance storytelling: Cropping can help you emphasize specific details or create a narrative by removing irrelevant background elements.
- Resize and reframe: Whether you need to resize your photo for a specific purpose or create different versions with varying compositions, cropping is a useful tool.
- Fix perspective and alignment: Cropping can help correct any skewed horizons or alignment issues in your photos, ensuring a balanced and visually pleasing result.
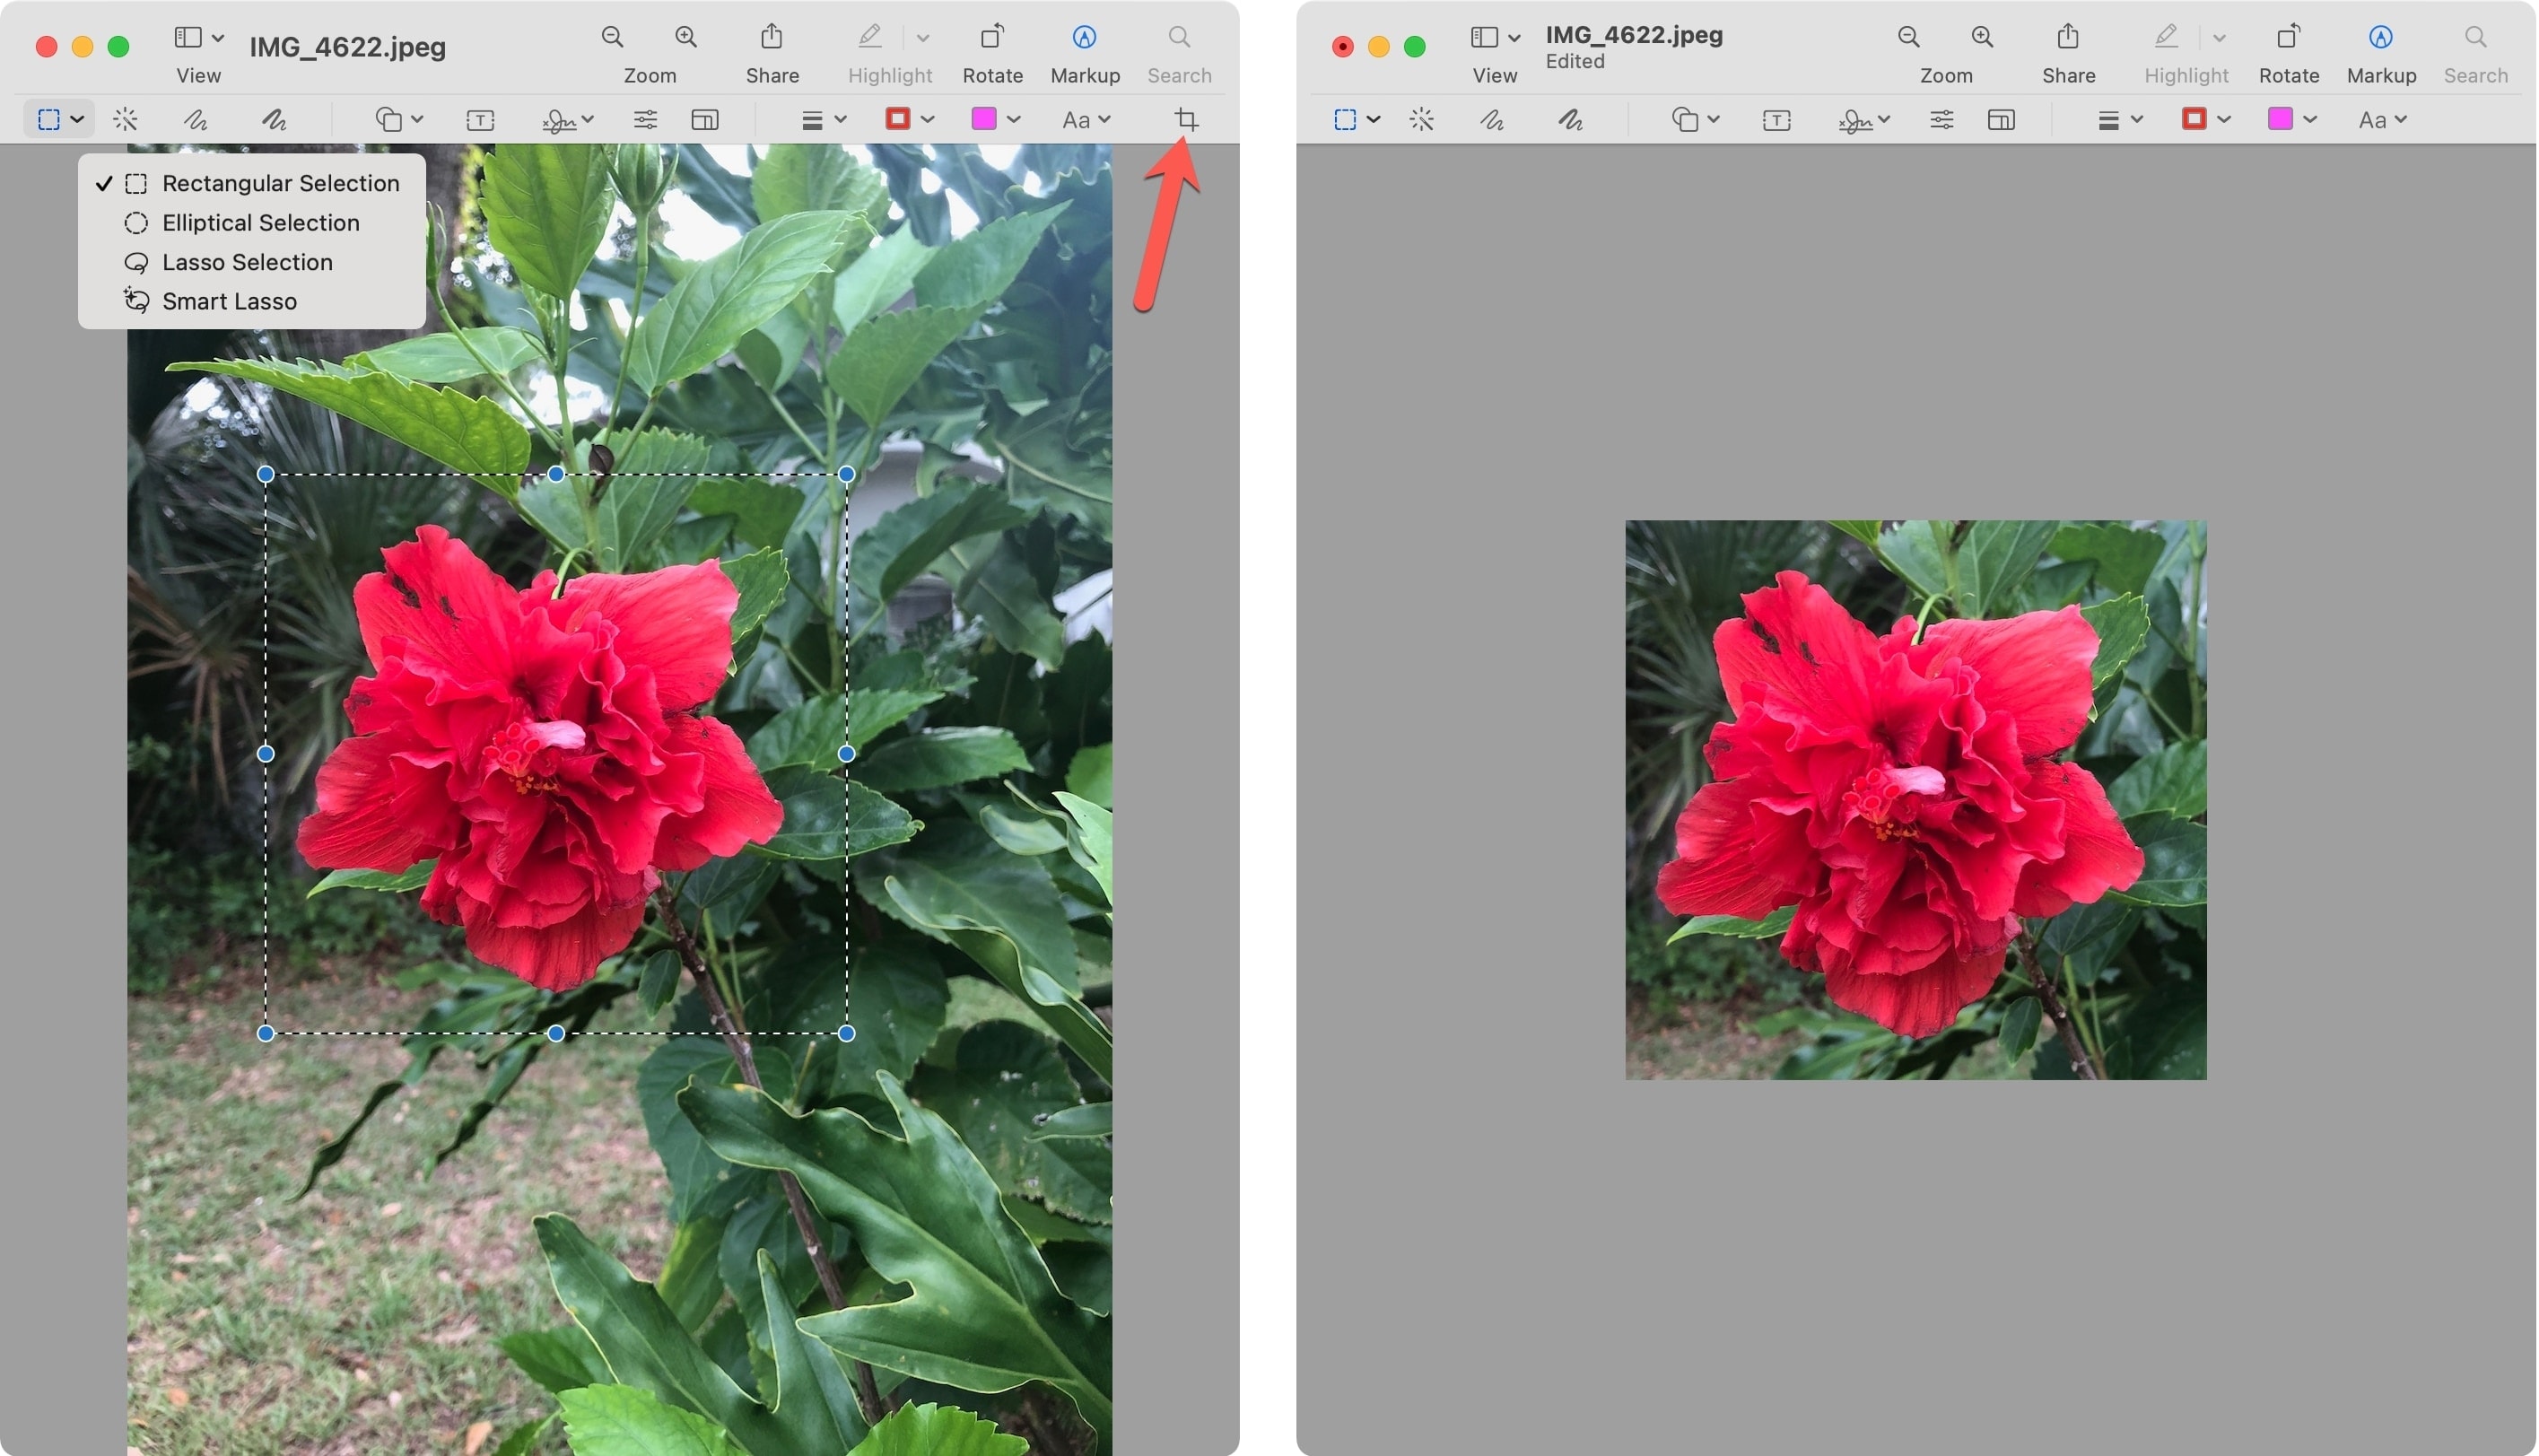
When it comes to cropping and rotating photos on your Mac, the first step is selecting the right tool. Luckily, there are various photo editing applications available that offer comprehensive cropping features. Whether you choose to use the built-in Photos app, Adobe Photoshop, or other software, make sure to select the crop tool to begin the process.
Mastering Photo Rotation
Rotating and cropping photos are essential steps in enhancing your images and creating visually appealing content. When it comes to photo rotation on Mac, mastering this skill is crucial. One important aspect of photo rotation is understanding the importance of rotation. Rotating your photos can correct their orientation and make them appear more natural and professional. It helps eliminate any tilted or sideways effects that may distract viewers’ attention.
The Photos app on Mac provides a simple and user-friendly way to rotate your images. With just a few clicks, you can easily adjust the orientation of your photos. Whether you have photos captured in portrait or landscape mode, the rotation feature enables you to align them perfectly. Moreover, the app allows you to crop your images, which allows you to focus on specific areas, remove unwanted elements, and enhance the composition of your photos.
By mastering photo rotation, you can significantly enhance the visual appeal of your images and create stunning content that captivates your audience effortlessly.
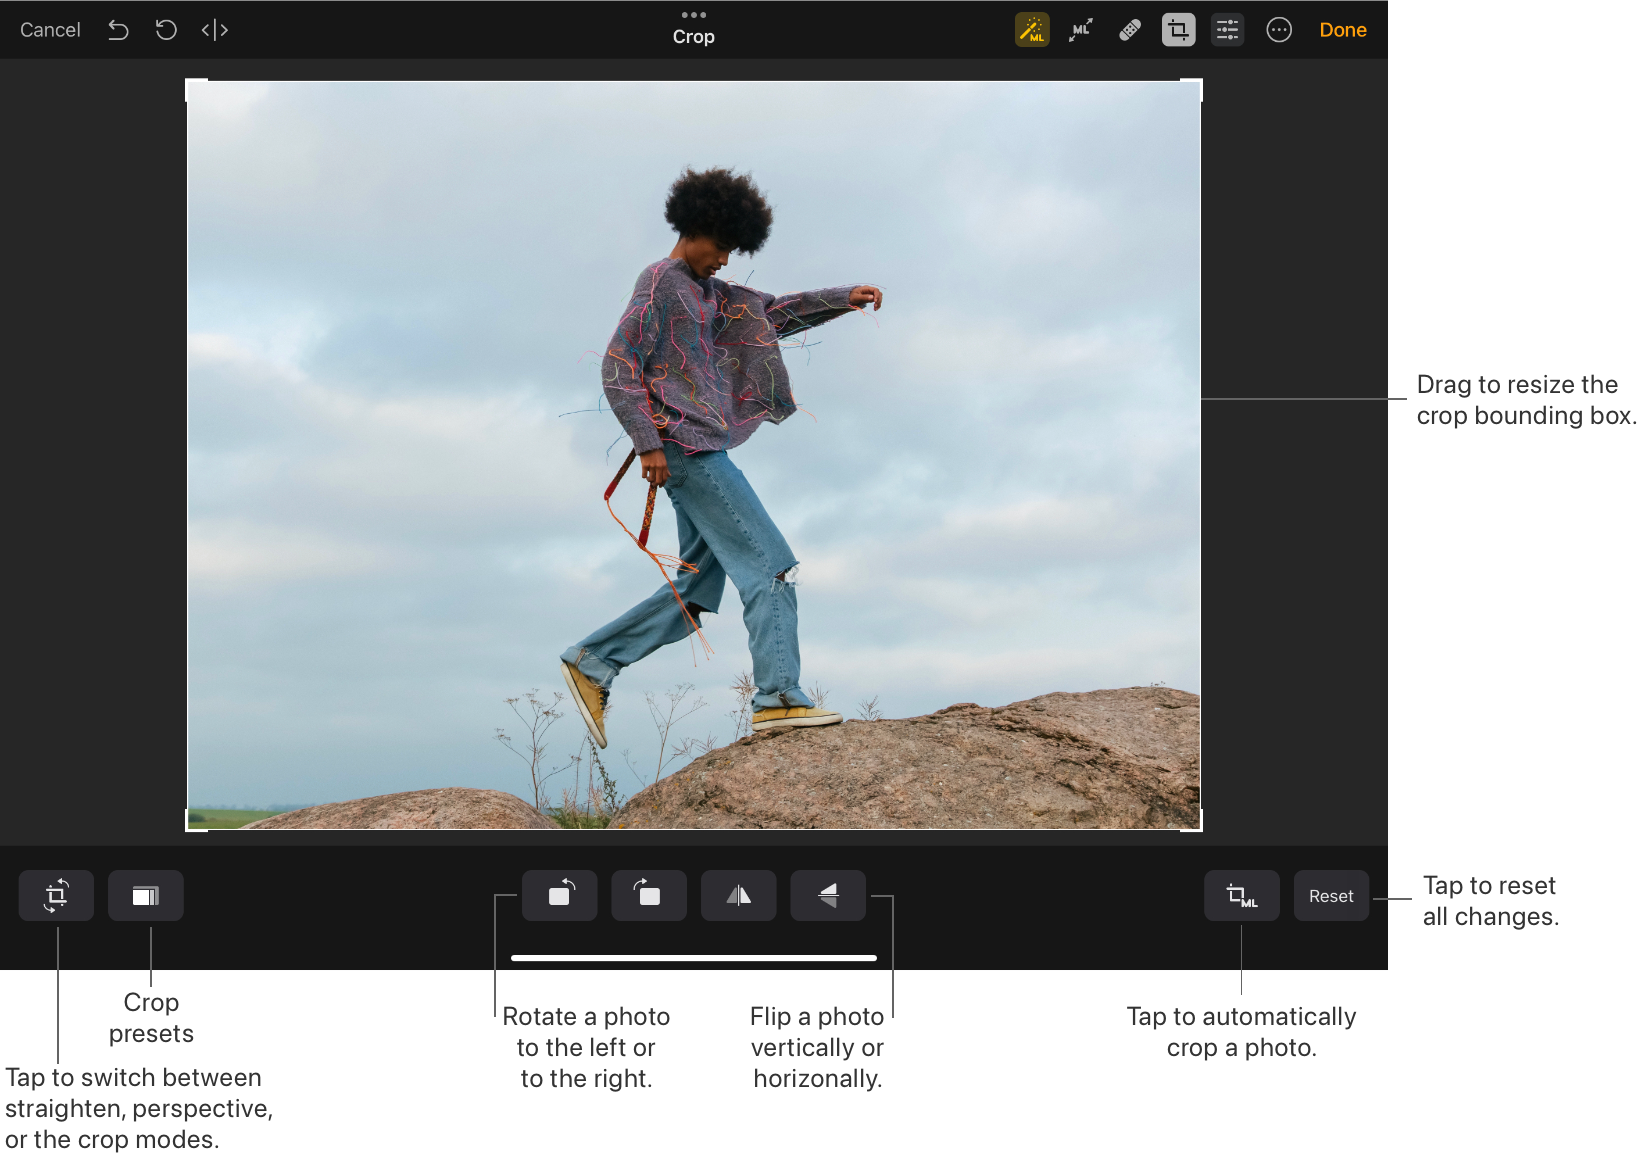
Utilizing Advanced Editing Features
|
Learn how to crop and rotate photos on Mac with ease. Utilize advanced editing features to adjust aspect ratios and apply filters for a professional touch. Enhance your photos by cropping to focus on the main subject. Rotate images to correct orientation and bring out the best angles. |
Preserving Image Quality
When cropping and rotating photos on Mac, it’s important to preserve the image quality. Understanding resolution is crucial to avoid loss of quality. Avoid over-cropping, which can degrade the final image. Focus on maintaining clarity while making adjustments.
Saving And Exporting Edited Photos
Exporting Photos: After you’ve made all the necessary changes, it’s crucial to save and export your edited photos. The process of exporting allows you to choose the right file format for your specific needs, ensuring the best quality and compatibility with other platforms. Remember to consider factors such as resolution, compression, and color depth to achieve optimal results when saving your photos.
Managing Edited Photos
Learn how to easily crop and rotate photos on your Mac with these simple steps. Enhance your edited photos and create professional-looking images with just a few clicks.
| Managing Edited Photos | |
| Organizing Edited Photos | Backing Up Your Edited Photos |
| Keep edited photos in labeled folders for easy access. | |
| Create subfolders to categorize photos by event or date. | |
| Use descriptive file names to quickly identify images. | |
| Regularly transfer edited photos to an external hard drive. | |
| Consider using cloud storage for added backup protection. |
Exploring Additional Tips And Tricks
When it comes to cropping and rotating photos on your Mac, there are several additional tips and tricks that can enhance your editing experience. One useful feature is batch editing, which allows you to apply the same edits to multiple photos simultaneously. This can save you a significant amount of time if you have a large number of images to edit.
Additionally, you can also add metadata to your photos, which provides information about the image such as the date taken, location, and even keywords to help with organization and searchability. This can be particularly useful if you have a large photo library and need to quickly find specific images. With these additional tips and tricks, you can take your photo editing skills to the next level on your Mac.
Credit: www.idownloadblog.com
Frequently Asked Questions On How To Crop And Rotate Photos On Mac
How To Crop Photos On Mac?
To crop photos on Mac, open the image in Preview, select the “Tools” menu, and choose “Crop. ” Adjust the selection box as needed, then click “Crop” to apply changes.
Can I Rotate Photos On Mac?
Yes, you can rotate photos on Mac using Preview. Open the image, navigate to the “Tools” menu, select “Rotate Left” or “Rotate Right” to adjust the orientation.
Is There A Quick Way To Crop And Rotate Photos?
For a quick way to crop and rotate photos on Mac, use the Photos app. Simply open the image, click “Edit,” then select the crop or rotate tool to make adjustments swiftly.
Conclusion
To sum up, mastering the art of cropping and rotating photos on Mac can greatly enhance your visual creations. With the easy-to-use tools available, you can effortlessly bring your images to life, adding that perfect touch to make them truly stand out.
By following the step-by-step guide in this blog post, you now possess the knowledge and skills to improve your photo editing abilities. So go ahead, unleash your creativity, and make the most of your Mac’s impressive photo editing capabilities.