To upgrade RAM on a Mac, first, determine the model of your Mac to find out the type and maximum capacity of RAM it supports. Then, purchase the compatible RAM modules and follow the specific installation instructions for your Mac model.
Upgrading the RAM on your Mac can significantly improve its performance and responsiveness. Whether you’re experiencing slowdowns when running multiple applications or noticing a decrease in overall system performance, adding more RAM can help alleviate these issues. In this guide, we’ll walk you through the process of upgrading the RAM on your Mac, providing step-by-step instructions and tips to ensure a smooth and successful upgrade.
By the end of this tutorial, you’ll have the knowledge and confidence to upgrade the RAM on your Mac and enhance its overall performance.
Preparation
First, ensure that the Mac is compatible with the new RAM. Check the official Apple website or use a system information tool to find out the RAM type and maximum supported capacity.
Gather the necessary tools including a screwdriver, antistatic wrist strap, and the new RAM module. It’s vital to work in a static-free environment, so consider using an antistatic mat or grounding yourself by touching a metal surface.
Understanding Mac Ram
To upgrade RAM on your Mac, first identify the type and specifications needed. Macs use specific types of RAM for optimal performance. Check your Mac model to determine the compatible RAM upgrades available. Ensure to match the speed and capacity requirements when selecting RAM for your Mac. Upgrading RAM can improve overall performance and allow for smoother multitasking on your Mac. Remember to follow the manufacturer’s guidelines for installing RAM properly to avoid any issues.
Backup Mac Data
Backing up your Mac data is crucial before attempting to upgrade the RAM. By doing so, you can ensure that all your important files and documents are safe and secure in case anything goes wrong during the upgrade process.
There are various methods for backing up your Mac data, such as using Time Machine or manually transferring files to an external storage device. Regardless of the method you choose, it is important to understand the importance of backup in protecting your valuable data.
Backing up your files serves as a safety net, helping you avoid potential data loss and giving you peace of mind. It allows you to restore your files in case of accidental deletion, hardware failure, or software issues.
| Methods for Backup |
|---|
| 1. Use Time Machine to create automated backups. |
| 2. Manually copy files to an external hard drive or cloud storage. |
| 3. Use third-party backup software for added flexibility and customization. |
Credit: www.avg.com
Opening The Mac Case
Opening the Mac Case
To upgrade the RAM on a Mac, the first step is to open the Mac case. This may seem daunting, but with the right instructions, it can be done easily.
Identify Screw Locations
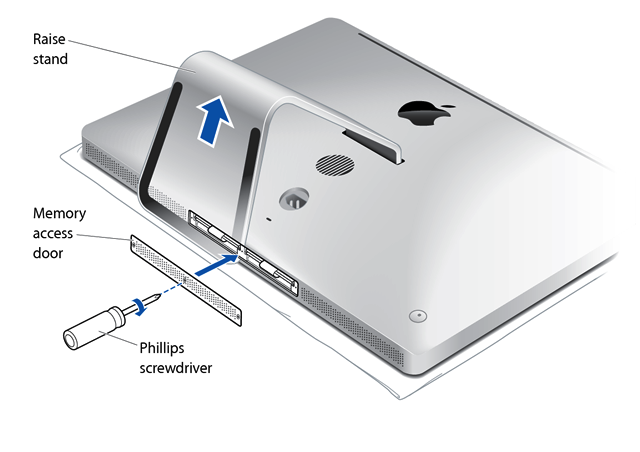
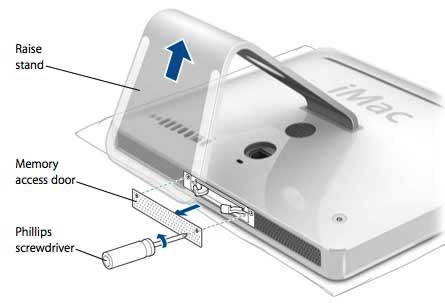
Before opening the case, it is important to identify the screw locations. There are usually a few screws that need to be removed in order to access the RAM slots. Using a small Phillips head screwdriver, carefully unscrew the screws, making sure not to strip them.
Use Correct Tools
Using the correct tools is crucial when opening the Mac case. Make sure to have a small Phillips head screwdriver, as well as an anti-static wrist strap to avoid damaging any internal components. Additionally, it is advisable to refer to a step-by-step guide or tutorial specific to your Mac model to ensure a smooth upgrade process.
Removing Existing Ram
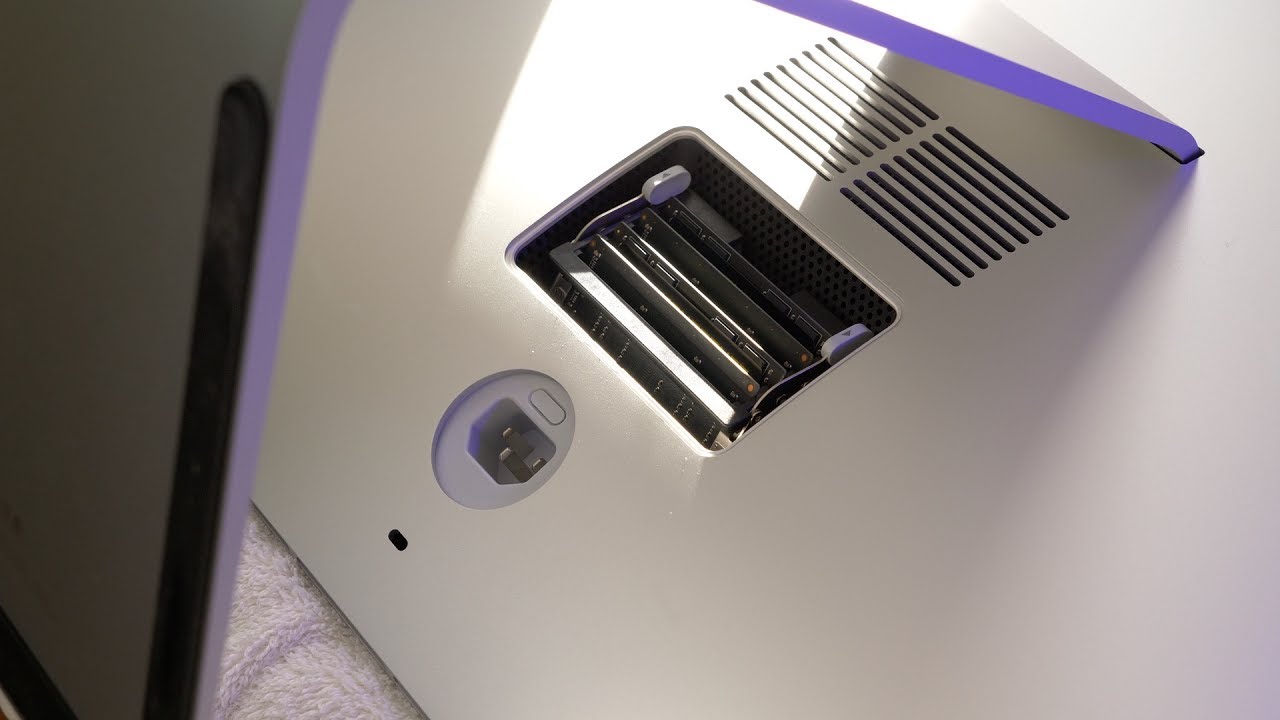
To upgrade RAM on your Mac, start by removing the existing RAM module carefully. Begin by shutting down your Mac and gently releasing the clips holding the RAM in place. Once released, slide out the existing RAM and set it aside before installing the new RAM module.
| Removing Existing RAM |
| Step-by-Step Removal |
| Make sure to wear anti-static wrist strap to avoid damaging your Mac. |
Installing New Ram
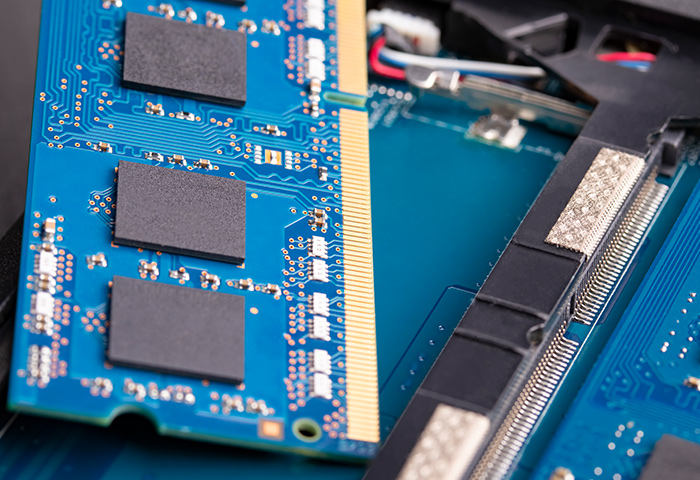
Ensure Proper Alignment: Before installing new RAM on a Mac, make sure to align the notch on the memory module correctly with the small bump inside the memory slot. This ensures that the RAM sticks are inserted properly.
Firm Pressing Technique: Apply even pressure with your thumbs to firmly press the new RAM module into place until it clicks. Make sure it is secure and fully inserted.
Closing The Mac Case
To close the Mac case and complete the RAM upgrade process, make sure to realign and secure the case components properly. Begin by carefully placing the cover back onto the Mac, ensuring that it is perfectly aligned with the rest of the case. Be gentle and avoid applying excessive force to prevent any potential damage.
Next, secure the case by fastening the screws until they are tight. Start with the corner screws, gradually working your way around the case. Make sure each screw is properly aligned with its corresponding hole. Utilizing a screwdriver, tighten the screws in a clockwise direction.
| Steps: | Description: |
|---|---|
| 1 | Place the cover back onto the Mac |
| 2 | Ensure the cover is aligned properly |
| 3 | Secure the case with screws |
| 4 | Tighten the screws in a clockwise direction |
By following these steps, you can successfully close the Mac case and complete the RAM upgrade, ensuring that all components are aligned and fastened securely.
Credit: www.youtube.com
Testing The Upgraded Ram
After successfully upgrading the RAM on your Mac, it is crucial to verify that the new RAM is functioning properly. This will ensure optimal performance and stability for your device. The first step in this process is to boot up your Mac and run a comprehensive diagnostic test.
There are various diagnostic tools available that can help you assess the health of your new RAM. One popular option is the Apple Hardware Test, which is built-in to Mac devices. To access this tool, simply restart your Mac and hold down the “D” key while it boots up.
Once the Apple Hardware Test opens, follow the on-screen instructions to initiate the diagnostic process. The test will scan your Mac’s hardware, including the newly upgraded RAM, and provide a detailed report of any issues or errors that may be detected. This will give you peace of mind knowing that the RAM upgrade was successful and that your Mac is operating at its best.
Credit: support.apple.com
Frequently Asked Questions On How To Upgrade Ram On A Mac
How Do I Know If I Need To Upgrade The Ram On My Mac?
Upgrading the RAM on your Mac can help improve performance if you are experiencing slow performance, frequent crashes, or if your computer struggles to run multiple programs simultaneously.
Can I Upgrade The Ram On A Mac Myself?
Yes, you can upgrade the RAM on a Mac yourself. However, it’s important to make sure you have the correct RAM module and follow the specific installation instructions for your Mac model. If you’re not comfortable doing it yourself, you can also take it to an Apple authorized service provider.
What Are The Benefits Of Upgrading The Ram On A Mac?
Upgrading the RAM on a Mac can significantly improve the overall performance of your computer. It allows you to run more programs simultaneously, reduces lag and freezing, and speeds up tasks such as opening large files, running complex software, and multitasking.
How Much Ram Do I Need To Upgrade On My Mac?
The amount of RAM you need to upgrade on your Mac depends on your specific usage. For everyday tasks like web browsing, email, and basic productivity software, 8GB to 16GB of RAM is usually sufficient. However, if you frequently work with resource-intensive applications like video editing or 3D rendering, you may benefit from 32GB or more.
Conclusion
Upgrade your Mac’s RAM for improved performance and speed. Follow these simple steps to boost your device’s capabilities effortlessly. Enhance multitasking and overall efficiency by expanding your RAM capacity today. Elevate your Mac experience by seizing this easy and impactful opportunity.
Transform your Mac into a powerhouse machine with a RAM upgrade!